


Transcript
A Guide to AI-Powered Operations for Red Teams (Q4 2025)
Red teamers and offensive security engineers juggle an arsenal of tools for reconnaissance, scanning, and exploitation. You might run WHOIS lookups, port scans, vulnerability exploits, secret scanners, and more, each in a separate tool or script. The result is a maze of consoles and manual steps that slow down your workflow. Kindo’s AI powered actions are designed to unify these tasks in one place and speed up your engagements.
In this post, we give you five real red team workflows that combine multiple tools and automate tedious tasks, from passive recon to vulnerability exploitation:
1. Domain recon & asset discovery - map a target’s external footprint (domains, subdomains, IPs) in seconds.
2. Web application fingerprinting - identify the backend and frontend tech stack behind a URL for rapid triage.
3. CVE proof-of-concept builder - quickly generate an exploit for a known CVE with a built-in reverse shell callback.
4. GitHub repository secret scanner - detect exposed API keys or credentials in code repositories with file/line context.
5. WordPress vulnerability scanner - uncover a WordPress site’s core and plugin vulnerabilities instantly.
Each of these examples shows how an AI driven chat interface can simplify offensive security workflows, from gathering intelligence to orchestrating complex exploit tasks, all through a simple prompt. Let’s dive in.
1. Domain Recon & Asset Discovery
The first step in any engagement is reconnaissance, mapping out the target’s domain and associated assets. In a traditional workflow, you might manually run a WHOIS query to get domain registration info, then use a tool like Censys (or dig through certificate transparency logs) to find subdomains and host data. This is time consuming and requires pivoting between multiple sites or command line tools. Kindo’s AI workflows can automate this passive recon in one go.
For example, you can ask: “Find the domain registration details for example.com and use Censys to list all subdomains and their IP addresses.” In response, the AI agent will fetch the WHOIS records for example.com, then query Censys for any hosts or certificates related to example.com to discover subdomains and associated IPs. The result is a neatly structured report of the domain’s ownership and external footprint, all gathered passively without alerting the target.
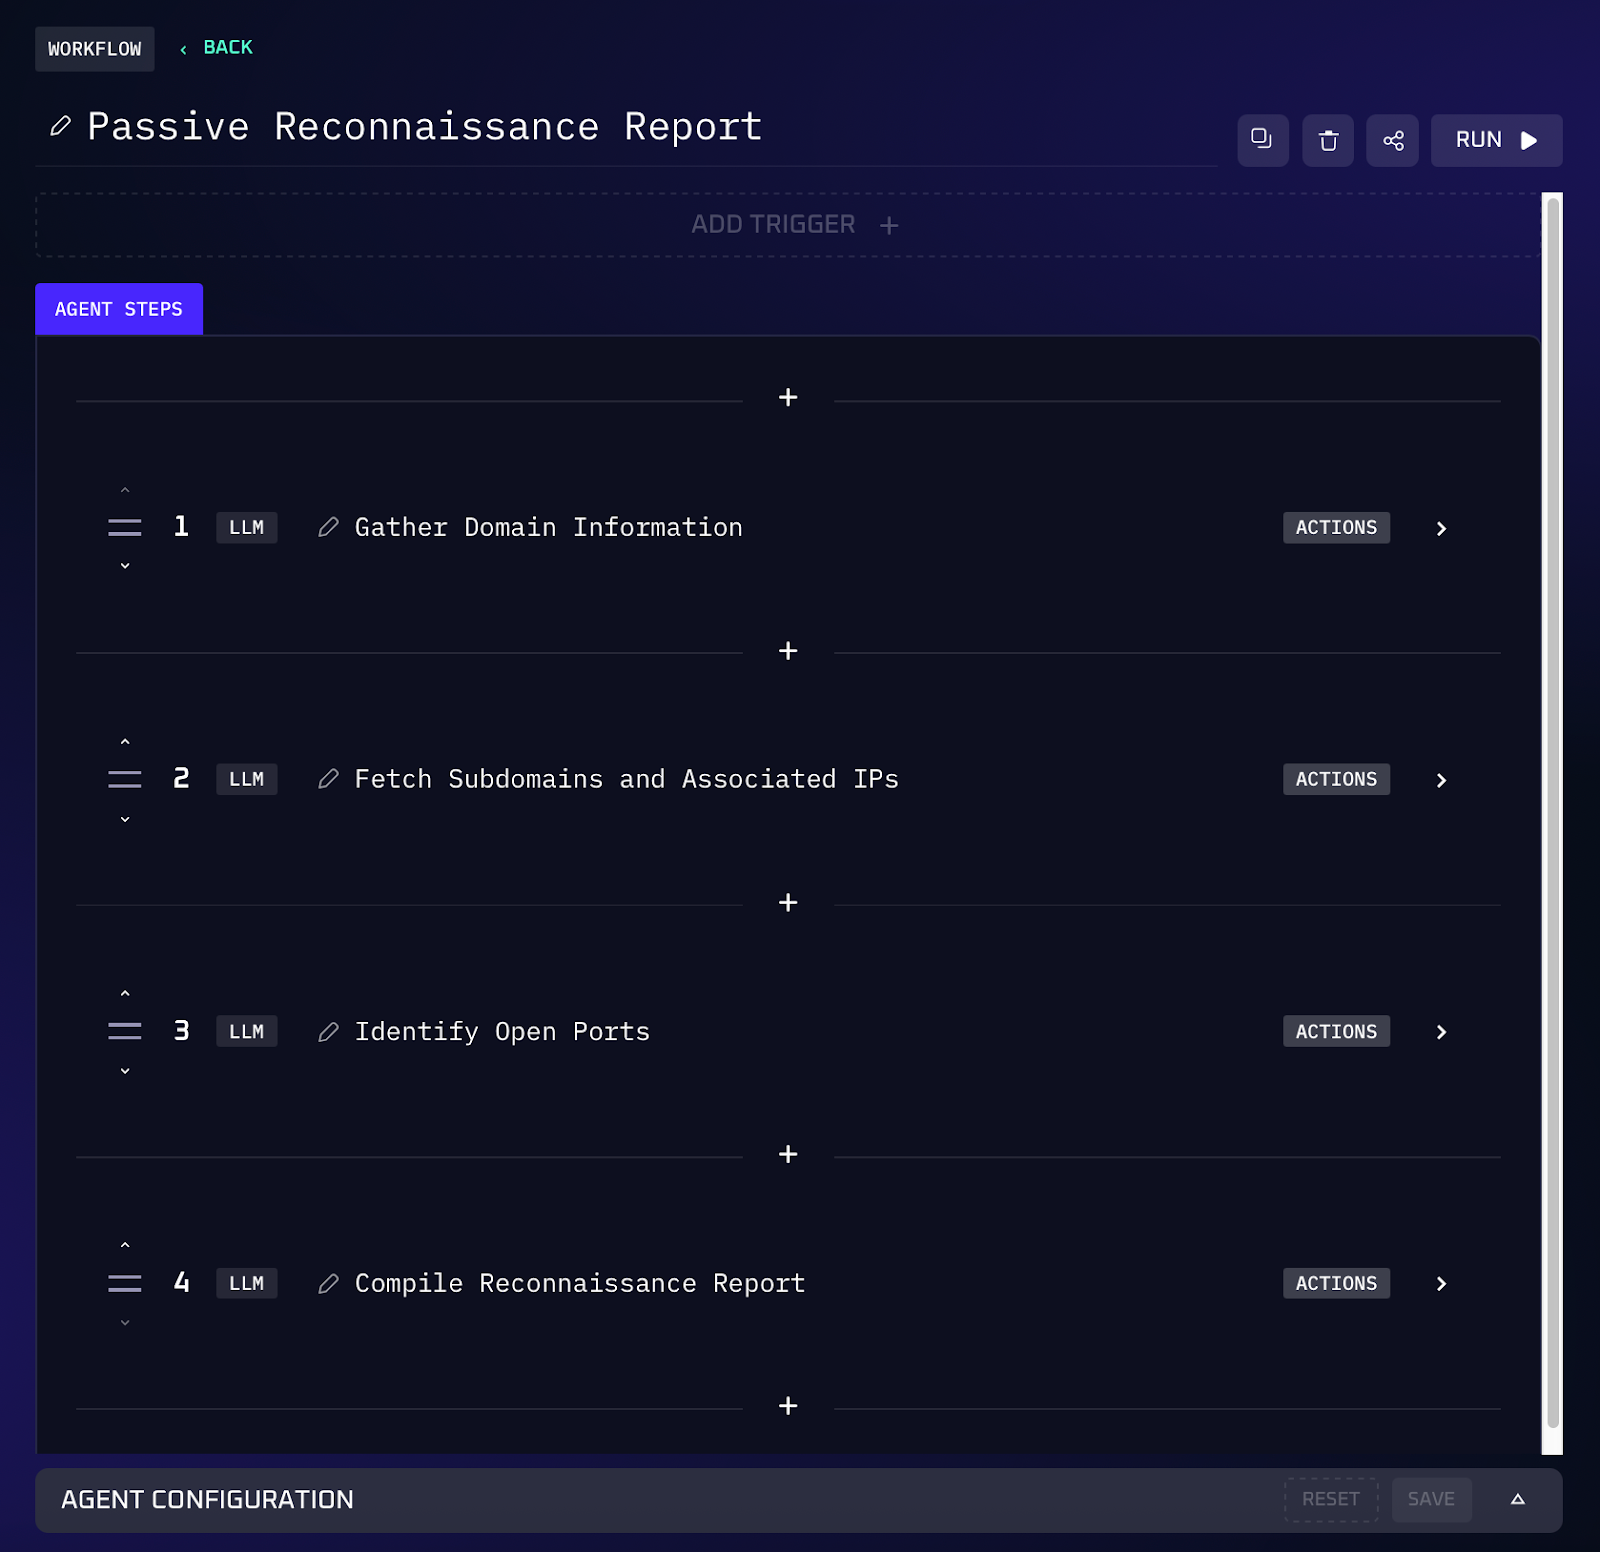
Workflow Steps (Passive Reconnaissance)
1. The agent takes the user provided domain (e.g. example.com) and calls a WHOIS lookup service. It retrieves registration details like the registrant name, organization, registration/expiry dates, and nameservers.
2. Next, the agent queries the Censys database for records related to the domain. This involves searching for hostnames and certificates containing example.com. It compiles a list of discovered subdomains and any known IP addresses or open ports from the Censys data.
3. The AI compiles the findings into a structured list. For instance, it might output: the main domain’s WHOIS info (registrant, dates, etc.), followed by a list of subdomains such as mail.example.com → 203.0.113.5, dev.example.com → 198.51.100.23, etc., including any pertinent metadata. This gives a view of the target’s external assets in seconds.
Value of Automation
By automating domain reconnaissance, a process that normally requires multiple tools and manual lookups becomes a one command task. Red teamers get an immediate map of the target’s external infrastructure, who owns the domain, what subdomains exist, and where they point, all without active scanning. This passive recon is not only faster but also stealthier, helping you cover more ground early in an engagement. The information comes organized and ready to use, so you can quickly spot interesting assets (like an admin portal subdomain) or possible weak points, without combing through WHOIS records or certificate data yourself.
2. Web Application Fingerprinting
Once you have a target URL or IP, the next step is often to figure out what’s running under the hood. Identifying the web server, frameworks, and front end libraries can guide your attack plan (e.g. knowing it’s a WordPress site or an Apache server with PHP). Normally, you might run a tool like WhatWeb or use a browser extension (like Wappalyzer) to manually check technologies, then piece together the tech stack. With an Kindo, you can do this instantly via chat.
For example: “Fingerprint the web tech stack of https://targetsite.com. Use WhatWeb and Wappalyzer to tell me what backend and frontend technologies it’s using.” The assistant will fetch the page and analyze it using those tools behind the scenes. It might report that targetsite.com is running NGINX 1.18.0 with PHP 7.4 on the backend, uses the WordPress CMS (with a certain theme), and loads frontend libraries like jQuery and Google Analytics. You get a quick rundown of the stack without logging into any scanner or exposing yourself through lengthy probing.
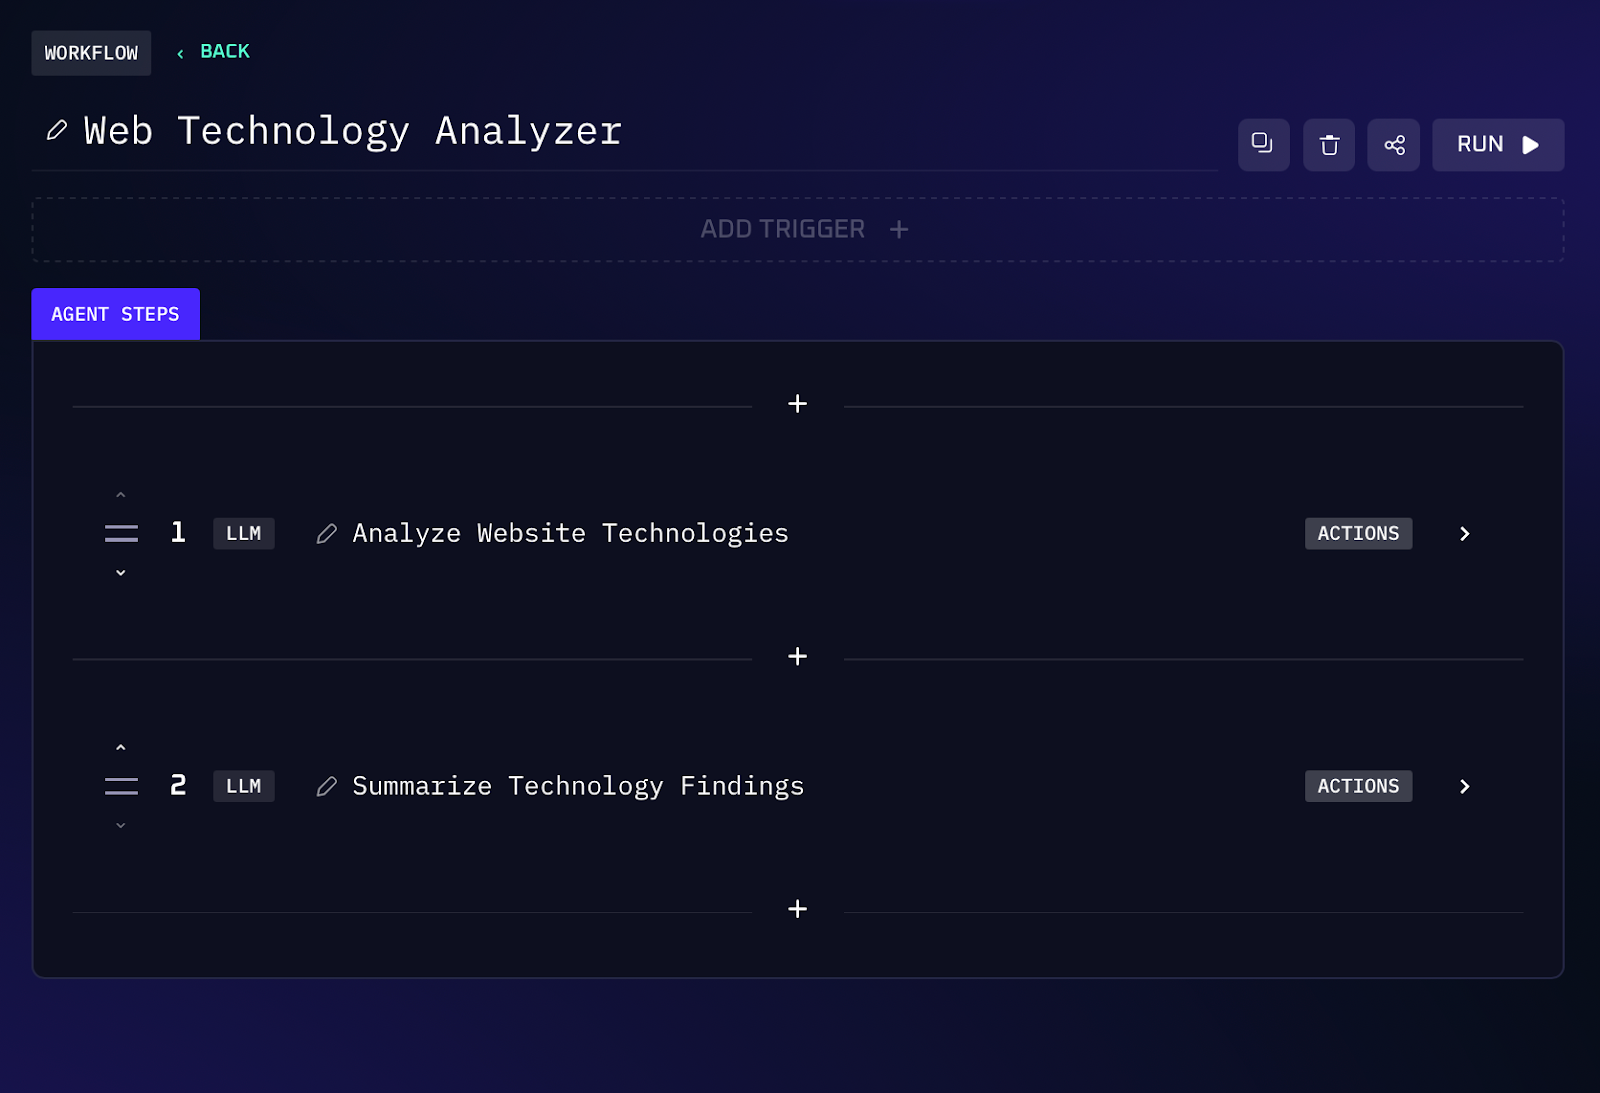
Workflow Steps (Tech Stack Identification)
1. The agent accepts a URL provided by the user. It first employs WhatWeb (a tool for identifying web server and backend tech) by sending an HTTP request to the target and reading the response headers and content. From this, it deduces server side details: web server type/version (e.g. Apache, Nginx), frameworks or languages (PHP, ASP.NET, etc.), and any CMS or platform indicators (maybe generator meta tags or specific cookies).
2. Next, the agent uses Wappalyzer (a technology fingerprinting tool) on the same URL. Wappalyzer inspects the page’s HTML and script files to detect frontend frameworks and libraries. It might find clues of things like React or Angular, jQuery versions, analytics or advertising scripts, and the presence of CMS plugins or themes.
3. The AI combines the findings into a summary of the target’s tech stack. For example, it might output: “Server:Nginx 1.18.0 on Ubuntu; Backend: PHP 7.4, WordPress 5.8; Frontend: jQuery 3.5.1, Bootstrap 4, Google Analytics.” Each identified component gives the red team quick insight into potential vulnerabilities.
Value of Automation
Identifying a web application’s stack at a glance helps focus your attack strategies. By automating fingerprinting, you eliminate the manual effort of running multiple tools and parsing their outputs. In one prompt, you learn what software you’re up against, invaluable for choosing the right exploit or technique. For instance, if you discover the target runs an old WordPress version, you can immediately pivot to WordPress specific exploits. If you see a particular JavaScript library, you might recall known CVEs for it. This intelligence gathering accelerates the vulnerability triage process. It also reduces context switching: instead of hopping between a scanner, your browser, and notes, the information appears right in the chat, ready for you and your team to discuss next steps or dive deeper into any suspicious components.
3. CVE Proof-of-Concept Builder (Exploit Generation)
Exploitation is a core part of red teaming, but writing or obtaining a proof-of-concept (PoC) exploit for a known vulnerability can be tedious. You might search online for existing exploits or adapt public code to include your own shell payload. Kindo’s AI can handle much of this grunt work. It can retrieve details about a given CVE and actually craft a working exploit on the fly, complete with a reverse shell callback to your machine.
For example: “Generate an exploit for CVE-2023-1234 that opens a reverse shell to 10.0.0.5:4444.” The AI will look up the specifics of CVE-2023-1234 (say it’s a buffer overflow in a popular web app), then either find an existing exploit template or use its knowledge of the vulnerability to create new exploit code. It will inject a payload to connect back to 10.0.0.5 on port 4444, and return a ready-to-run script or program. Essentially, it automates the role of an exploit developer, giving you a PoC you can test against the target system or in a lab environment.
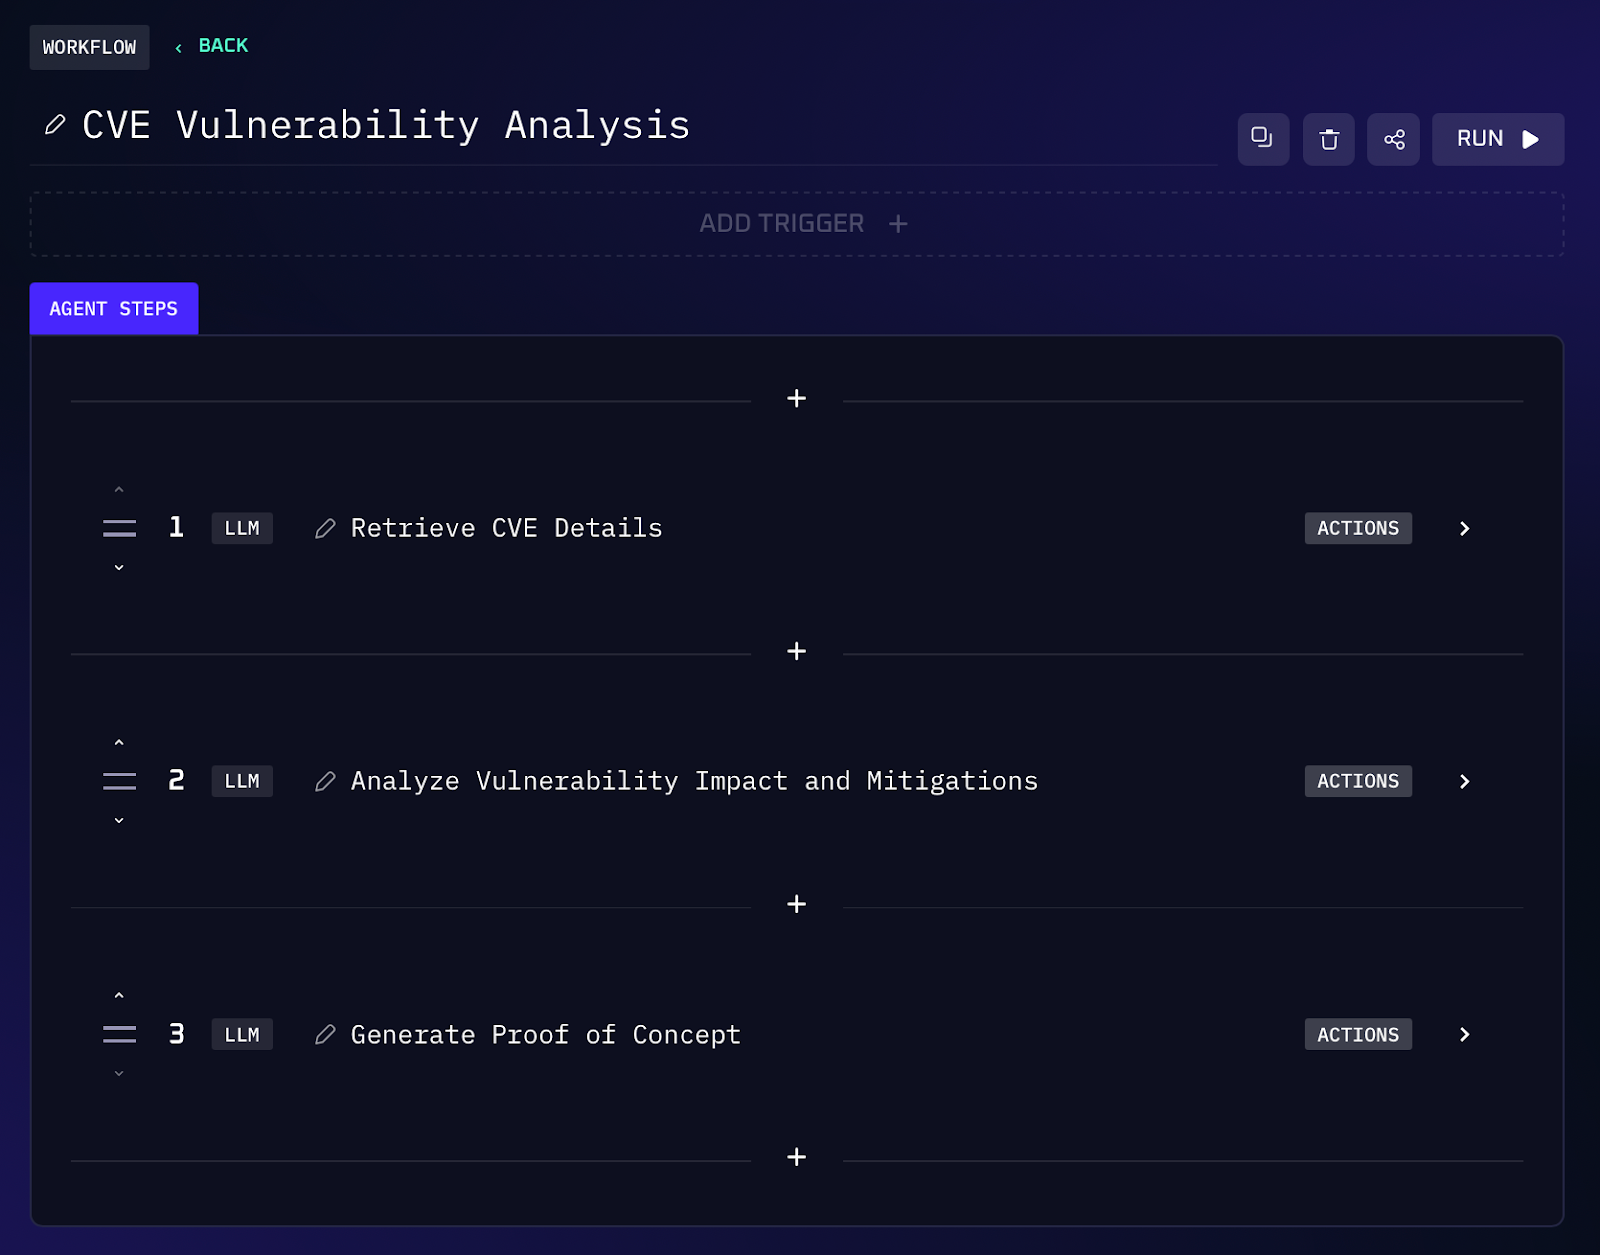
Workflow Steps (Exploit Generation)
1. The agent takes a user specified CVE identifier (e.g. CVE-2023-1234) along with a callback IP address and port. It first queries a vulnerability database or knowledge base to gather details on that CVE, such as the affected software, version, and the nature of the flaw (e.g. SQL injection, buffer overflow, remote code execution).
2. If a public proof-of-concept or exploit exists (for example, on Exploit DB or GitHub), the AI may retrieve and analyze it. Otherwise, it uses the vulnerability details to formulate an attack vector.
3. The agent then generates exploit code tailored to the situation. This could be a Python script, a snippet of C code, or even a crafted input file, whatever format is appropriate for the CVE. It ensures to embed a reverse shell payload that will connect back to the provided IP and port when the exploit successfully runs.
4. The output is delivered as a ready-to-run proof of concept. It might come with usage instructions or comments in the code. For example: “Exploit.py - run this script to exploit CVE-2023-1234 on a vulnerable server. It will open a shell back to 10.0.0.5:4444.” The red teamer can then take this PoC and execute it (in a controlled environment), gaining a foothold if the target is indeed vulnerable.
Value of Automation
Building exploits from scratch or even adapting them from public sources can be a time sink and requires specialized skill. By automating the PoC creation, red teamers can move faster from vulnerability identification to exploitation. This is especially useful for internal validation, for example, demonstrating the impact of a CVE to stakeholders or testing it on a lab system before using it in an engagement. The AI generated exploit can save hours of coding and debugging. It also standardizes quality: the agent will include the correct callback and any needed modifications, reducing the chance of error when you run it.
4. GitHub Repository Secret Scanner
It’s quite common for developers to accidentally commit secrets into source code repositories. Finding these exposed credentials is a goldmine for red teamers (and a serious risk for organizations). Traditionally, you might use tools like TruffleHog or GitLeaks, or manually grep through code, to spot anything that looks like a secret. The process can be cumbersome, especially for large repositories. Here, an AI driven secret scanning action can do the heavy lifting in seconds.
For example: “Scan the repository https://github.com/YourOrg/YourApp for any exposed API keys or secrets and list occurrences with file paths and line numbers.” The AI agent will fetch the repository’s content, then systematically scan each file for patterns that resemble secrets, things like 40 character hex strings (typical of access tokens), AWS key formats, private key headers, database connection strings, and so on. It then returns a report of any findings, pinpointing exactly where each secret was found.
Workflow Steps (Secret Scanning)
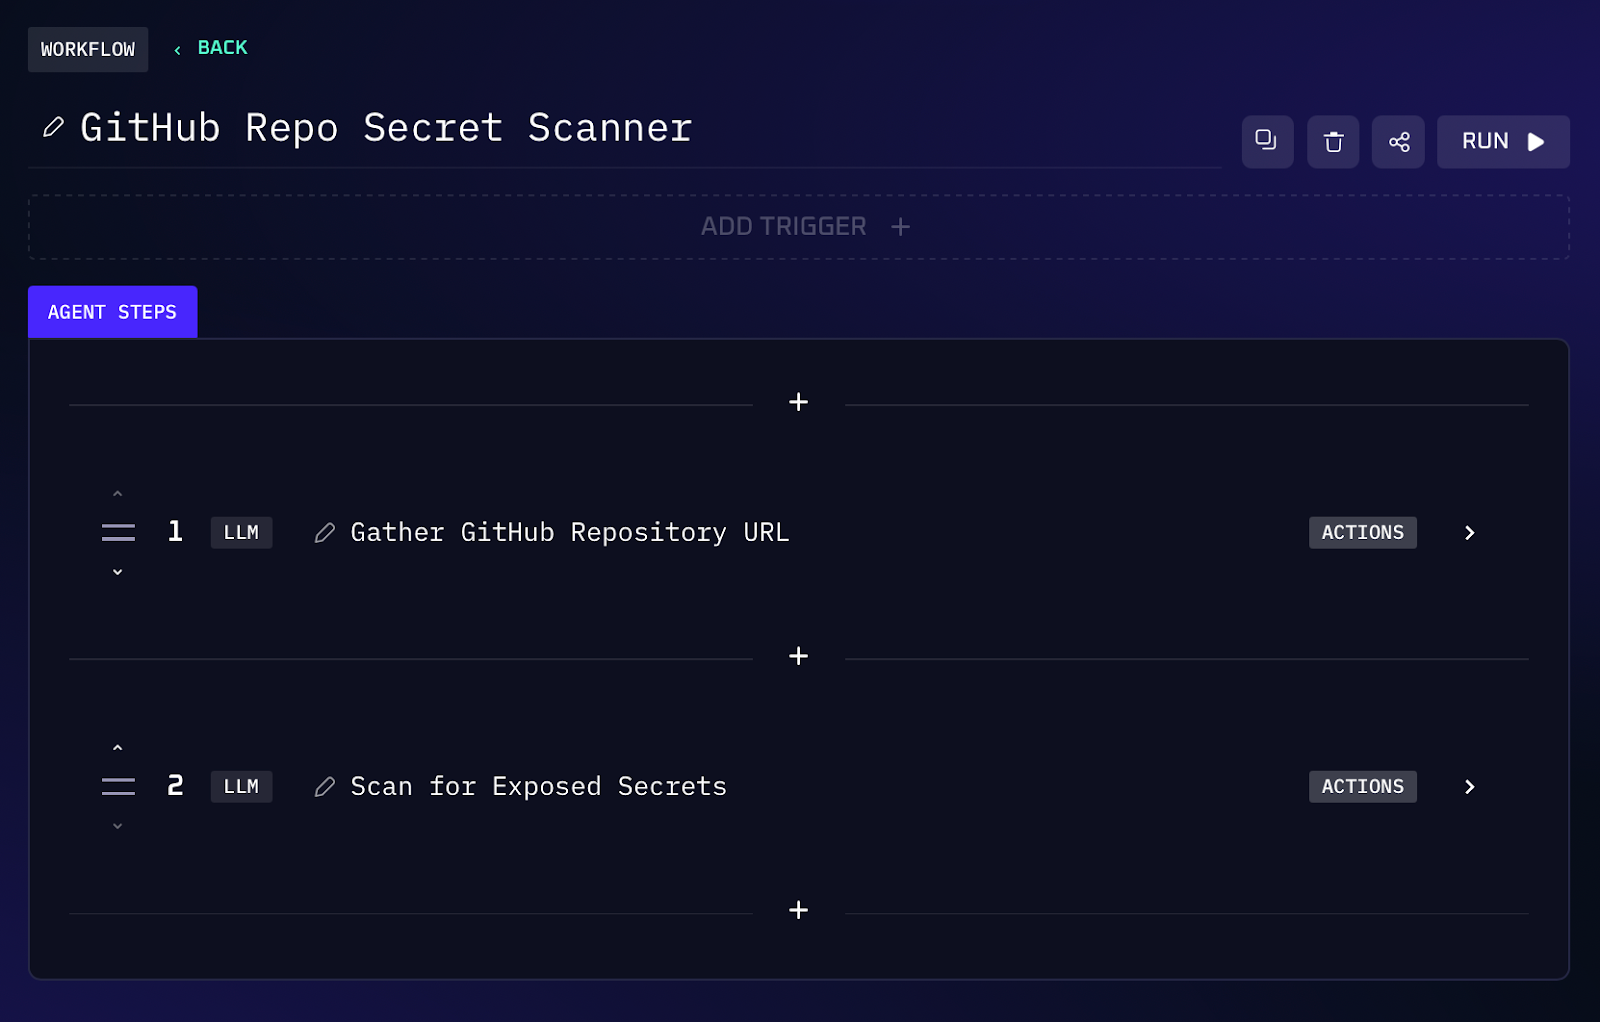
The agent takes the GitHub repository URL (which can be public or provided via our integration functionality if private) from the user.
2. The AI scans through each file in the codebase looking for patterns that indicate secrets. This includes common API key patterns (like AKIA... for AWS keys), strings that look like hashes or tokens, credential keywords (such as “password=”, “api_key:”).
3. Whenever a potential secret is found, the agent notes the filename and line number. For example, it might detect an AWS access key and secret in config.js on lines 10-11, or a hard coded database password in settings.pyon line 45.
4. The agent produces an output list of findings. Each entry includes the file path and line, and often a snippet or description of what was found. This concise list lets the red teamer know exactly where sensitive data lies in the code.
Value of Automation
Performing a credential scan across a repository with a single command saves an enormous amount of time and helps ensure nothing slips through the cracks. For a red teamer, one exposed secret can be the key to deeper access (e.g. an API key that allows login to a cloud account). By quickly identifying these in target code, you gain potential pivot points without manual code review. Moreover, doing it via an AI chat means you can easily refine the search or ask follow up questions (“show me the context around that line”) in the same interface. This beats combing through dozens of files by hand.
5. WordPress Vulnerability Scanner
WordPress is ubiquitous and often a focus for attackers due to its rich ecosystem of plugins and themes, each a potential source of vulnerabilities if not kept updated. Security professionals commonly use tools like WPScan to enumerate a WordPress site’s version and known vulnerabilities. However, running a WPScan manually requires installation, API keys, and interpreting the output. Kindo’s ability to use the WPScan.com API makes this process a simple query.
For example: “Check http://exampleblog.com for WordPress vulnerabilities using WPScan and list any issues with their CVEs and severity.” The AI agent will send the target URL to the WPScan API, which returns information such as the WordPress core version, a list of discovered plugins (and their versions), and any known vulnerabilities associated with the detected versions. The agent then formats these results, including any available CVE IDs and severity ratings.
Workflow Steps (WordPress Vulnerability Scan)
1. The agent takes a WordPress site URL from the user. It queries the WPScan vulnerability database API with that URL. Behind the scenes, this triggers a scan (mostly passive) that identifies the WordPress core version and enumerates any publicly identifiable plugins and themes of the site.
2. The WPScan API responds with data on known vulnerabilities. For each detected component (core, plugins, themes), it provides a list of any matching vulnerability entries from its database. This typically includes the CVE identifier (if one exists), a description or title of the flaw, and a severity or risk rating.
3. The AI parses this information and compiles a list of findings. It will show if the WordPress core is outdated (and how many vulnerabilities affect that version), and then list vulnerable plugins/themes by name. Each entry might be formatted like: “Plugin: PluginName vX.Y - CVE-2024-12345 (Critical severity, remote code execution)”.
4. The results are presented in an easy-to-read format for the red teamer. You get a quick vulnerability report specific to that WordPress site. If no serious issues are found (e.g. the site is fully updated), the agent can also report that, giving peace of mind or indicating you should focus elsewhere.

Value of Automation
Using the WPScan API via Kindo means you can perform a WordPress security audit in seconds, without leaving your conversation or setting up separate tools. This is incredibly useful during recon: if you discover a target runs WordPress, a single prompt yields all the low hanging fruit in terms of known exploits. It’s lightweight and fast, perfect for quickly checking a site before spending time on deeper analysis. Additionally, the structured output helps prioritize which findings to pursue first. Overall, this automation ensures you never miss obvious WordPress weaknesses and saves you the hassle of manual scanning. It integrates a well known tool into a simple chat experience, enabling even less experienced team members to run an effective WordPress audit just by asking a question.
Take Your Next Steps With Kindo
By bringing reconnaissance, exploit generation, and vulnerability scanning into one intelligent workspace, Kindo helps offensive security teams move from fragmented tools to unified workflows that feel effortless. Every action, from mapping domains to writing proof of concept exploits, becomes faster, clearer, and more repeatable.
If you are ready to optimize your next engagement, explore Kindo’s AI workflows firsthand. Start with a personalized demo to see how easily these workflows can fit into your existing toolkit. Whether you are leading red team exercises or automating daily tasks, Kindo helps you focus on strategy while the AI handles the heavy lifting.
Interesting in additional red team content? Check out our previous red team workflows post, and our Red Team use case page.

